
Introduction to Docker

#tl;dr This post gives a highlevel overview of docker. It also sums up what I’ve learned setting up elasticsearch, neo4j and a ruby sinatra service in docker containers.
#What is docker?
Docker is basically an open source toolset for creating and managing VM-like linux containers (LXC).
The overall goal is to have cheap, portable, composable, single responsibility systems.
###cheap Linux containers are extremely lightweight compared to virtual machines, because they share some aspects of the hosts OS (like the kernel). This makes booting up a container really cheap and fast. If you’re interested in a detailled performance analysis, you should read this comparison. It compares solaris zones, which are similar to linux containers, to xen and kvm.
###portable Since version 0.7 docker containers run on all major linux distributions. As the system adds a layer on top of the hosts filesystem (called aufs), it doesn’t care about the used filesystem. This means you can create the container on your developer ubuntu system with ext4 filesystem and then deploy the final version to a fedora VM inside an amazon EC2 instance with ext3.
###composable Docker makes it easy to expose ports to the host system or other containers or let containers use disk volumes of each other. All this can be done with simple command line switches, you don’t have to touch iptables or mtab.
###single responsibility Developers know the single responsibility principle from object oriented coding. The unix world knows it as “do one thing and do it well”. This principle helps making your systems clear in what they do and easier to maintain.
For further reading on what docker is see this infoq article or take a look at these slides:
#What docker is not?
- officially production ready (although everyone and his mother is using it in production already)
- a full blown configuration management tool like chef or puppet (but there’s support for puppet and chef)
#Building blocks
###Image
An image is a read only, docker bootable system. Think of it as a DVD-ROM.
###Container
Once you boot an image, docker creates a container. Think of it as a VM.
#Leave theory, talk practice!
###Install docker As docker is built on top of linux containers (LXC), the best way to try it is on a linux computer. You can use it on other OSes (like OS X) (because it runs well in already virtualized environments), but I haven’t tried that yet. The installation is well documented, so I won’t repeat that here. Just take those 2 links and come back once you’ve installed docker:
###Run an image Now that you have docker installed, you’re ready to roll! When you type
docker run base ping google.comyou should see something like this:
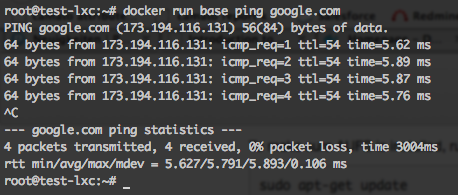
Now what happens there?
docker run basetells docker to start a container from the base image. The cool thing is that you can pass a command to the container which it will execute: ping google.com.
You can try the same with
docker run base ls -la(Everything you can do on the command line: Docker CLI reference)
###I want more functionality
There’s not much included in the base image, because it is meant to serve as a starting point. There isn’t even curl installed. The docker ecosystem provides you another nice thing: the docker index.
This is a database of predefined images from the docker guys and users. A quick search for curl, for example, brings this image up: https://index.docker.io/u/speg03/curl/.
You can install it with
docker pull speg03/curland the result:
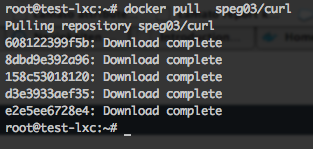
Now you can curl, finally!
docker run -t -i speg03/curl -XGET http://google.comwhich yields
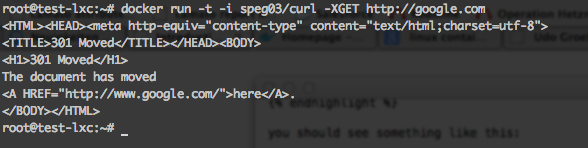
But wait, isn’t there the curl command missing? You’re absolutely right.
If you take a look at the Dockerfile, you can see the ENTRYPOINT statement at the bottom:
ENTRYPOINT ["curl"]This command get’s executed automatically when you spawn a container from an image. Every container has exactly one purpose, right? So this is where it goes. Let’s move on to the next lesson: the Dockerfiles.
###Create your own shiny new image with a Dockerfile
Dockerfiles define, how an image can be built. You could compare it to a Makefile. A Dockerfile let’s you automate the tasks, that you could as well do manually. The nice thing is, that they also serve as a documentation for your images.
Every Dockerfile defines an image to start from:
FROM tpires/neo4jdefines https://index.docker.io/u/tpires/neo4j/ as starting point.
Let’s say you’d like to add the neo4j authentication extension to the container:
ADD authentication-extension-2.0.0-1.0-SNAPSHOT.jar /usr/share/neo4j/plugins/authentication-extension-2.0.0-1.0-SNAPSHOT.jarThis statement copies the file authentication-extension-2.0.0-1.0-SNAPSHOT.jar, that’s assumed to reside in the same directory as the Dockerfile, to the directory /usr/share/….
A complete list of available commands can be found in the Dockerfile reference. You might also check out the Dockerfile best practices.
###Handling configuration
Most applications need some form of configuration. There seems to be no one-size-fits-all solution with docker yet. I’d like to show you two (and a half) possible solutions for this problem:
####Configuration via environment parameters
As mentioned earlier, docker makes it easy to pass information to the container via CLI parameters.
docker run -e DATABASE_SERVER=http://localhost:9876 ubuntu env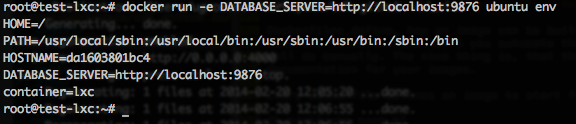
This way of providing configuration is definitely the cleanest and therefore recommended way. But there may be times, when you have to put some aspects of configuration into an image.
####Configuration baked into the container
This solution is obviously completely self-contained. So the only thing you need for running it, is a docker installation. The drawback is, that you have to create a new image whenever the configuration changes.
You can achieve this by copying the necessary config files from your working directory into the image while building it.
In our neo4j example, this would be:
ADD neo4j-server.properties /etc/neo4j/neo4j-server.properties####Mounting configuration files from the host system
While being possible, this is certainly not the best option for finished containers. But this solution can come in handy while developing a “Configuration baked in” image. You don’t have to re-build the image every time you change a configuration parameter. A simple restart with a fresh container is enough.
You can mount a directory from your host system to the container with -v command line switch:
docker run -v /root:/mnt/data ubuntu ls /mnt/dataWith this command, you’re able to access the hosts /root directory as /mnt/data inside your container. For development, you could symlink all necessary configuration files to such a mounted directory.
See also this discussion.
###Let it run
Now that we’ve created an image with a database server and adapted its configuration, we’d like to let it run!
docker run -p 9200:9200 -p 9300:9300 -name elasticsearch -d dockerfile/elasticsearchstarts a container from the image dockerfile/elasticsearch and maps the exposed port 9200 to the hosts port 9200. We don’t even have to think about iptables. It just works.
When you decide, that you need another elasticsearch instance, you could easily map the exposed ports 9200 and 9300 to 9201 and 9301 of the host.
The -d switch runs the container in the background, so your console doesn’t get attached to it.
You can list all running containers with
docker psAll known containers (also the exited ones) are listed by the command
docker ps -a###But, Mum, I’d like to store data!
The thing with containers is, that they are meant to be disposable. Databases, on the other hand, store their data on the filesystem of the same machine by default. What does this mean? Every time you start a container from an image, you will get a fresh container. With a clean file system. While this is good for application servers, it’s very good for databases or similar applications.
Meet the docker volumes! The idea is: when everything is a container, why should your data store be different?
So you can basically create a new container, which can quit immediately; we just need the container:
docker run -name neo4j-data-volume busybox trueThis command creates a new container from the busybox (a very small) image with the name neo4j-data-volume. You might have noticed in docker ps, that docker creates container names itself when you don’t specify one.
Our neo4j server Dockerfile specifies, that the container expects a volume, which it will mount as /data:
VOLUME /dataThis volume could be an external moint (via -v command line option, as seen earlier) or a volume from another container:
docker run -volumes-from neo4j-data-volume -d tpires/neo4jNote, that the container neo4j-data-volume doesn’t need to be running any more. You can access the filesystem of this container at the /data path.
Now you can restart the neo4j server any time you like and copy/move the neo4j-data-volume to any other host. True containerization!
###Access ports from another container
Your super shiny NoSQL-Graph-RDF-RDBMS-YouNameIt-AllInOne database is of no use, when you can’t access it from your application.
But, you’ve guessed it, docker provides a solution to this problem as well. It’s quite easy to link containers to each other.
I won’t go into detail on that too much, as the explanations in this article are really good and clear.
###Misc. tips’n’tricks
####Remove all containers that have exited
docker rm `docker ps -a | grep Exit | awk '{ print $1 }'`CAUTION This command also removes containers that you might still need as data volumes!
I’ve named all data volumes with the scheme …-data-volume, so the following command doesn’t destroy those:
docker rm `docker ps -a | grep Exit | grep -v data-volume | awk '{ print $1 }'`####Where are docker images stored, actually?
That question (and some related ones) is answered here in detail: http://blog.thoward37.me/articles/where-are-docker-images-stored/
#Issues I’ve come across
- Restarting named containers yields: Error: create: Conflict, The name NAME is already assigned to c01db478637c. You have to delete (or rename) that container to be able to assign NAME to a container again.
- No obvious way to inspect an image when entrypoint is defined
- Lacking best practices due to young age of docker
- Security takes some aspects to be aware of.
#Conclusion
I’m pretty sure, I forgot to mention some really important things. But hey, this is the internetz. There’s lots of other resources out there. I hope, you have as much fun and excitement using docker as I have. Thanks for staying with me that long, I hope you find this introduction useful.
For further reading visit the following sites:
- http://samsaffron.com/archive/2013/11/07/discourse-in-a-docker-container
- https://medium.com/code-adventures/65136a4a9d8
- http://kencochrane.net/blog/2013/08/the-docker-guidebook/